I've completed my antenna / wx station mast finally after several months of bio-design processing (thinking). Used a good quality 5' mast from Radio Shack as other masts seemed flimsy and cheap. Crafted a cross member and auxiliary masts from rigid PVC pipe. Not too long so they would stay stiff and straight. Added a guy wire to the wx station mast just to be sure - very solid. Painted the cross member it to match the shaft.
Scanner on one PVC mast, 2 meter HAM radio on main mast, wx station on other pvc mast. Wires extended via Cat 5 twisted pair and weather protected in a weather-resistant box mounted to the pole. Box is completely sealed with silicone inside and out.
Mast is grounded with 6 gauge solid core copper wire to a 8' copper clad steel rod driven into the ground just below the antenna.
I tested the 2 meter HAM antenna and wx station together for several days. No issues. (For those curious, I ran my APRS station for 5 days with a auto xmit every 60 seconds).
Should all go up on the roof this week after the rain stops.
Welcome to the Cumulus Support forum.
Latest Cumulus MX V3 release 3.28.6 (build 3283) - 21 March 2024
Cumulus MX V4 beta test release 4.0.0 (build 4019) - 03 April 2024
Legacy Cumulus 1 release 1.9.4 (build 1099) - 28 November 2014
(a patch is available for 1.9.4 build 1099 that extends the date range of drop-down menus to 2030)
Download the Software (Cumulus MX / Cumulus 1 and other related items) from the Wiki
Progress on Mounting WX Station
-
ScottVan

- Posts: 73
- Joined: Fri 03 Jun 2011 2:58 am
- Weather Station: F/O
- Operating System: Win 10
- Location: Ballston Lake New York
Progress on Mounting WX Station
You do not have the required permissions to view the files attached to this post.
-
Charlie
- Posts: 363
- Joined: Thu 04 Feb 2010 12:22 pm
- Weather Station: 1wire-Cumulus & Fine Offset
- Operating System: Windows 7
- Location: Whitehorse, Yukon Territory, Canada
Re: Progress on Mounting WX Station
Very cool design! Where are you going to mount the transmitter for the weather station, and did you do your testing with all the cable length in place? Also, slightly off topic, the scanner antenna looks different from anything I've ever seen before. What type is it?
-
beteljuice

- Posts: 3292
- Joined: Tue 09 Dec 2008 1:37 pm
- Weather Station: None !
- Operating System: W10 - Threadripper 16core, etc
- Location: Dudley, West Midlands, UK
Re: Progress on Mounting WX Station
If possible you really should think about lowering your rain-bucket to a more accessible (wind sheilded) level.
They have a nasty habit of not working in dark and nasty times
.. In fact weather stations don't like weather
They have a nasty habit of not working in dark and nasty times
.. In fact weather stations don't like weather
......................Imagine, what you will KNOW tomorrow !
-
daj

- Posts: 2041
- Joined: Tue 29 Jul 2008 8:00 pm
- Weather Station: WH1081
- Operating System: Pi & MX
- Location: SW Scotland
- Contact:
Re: Progress on Mounting WX Station
Agreebeteljuice wrote:If possible you really should think about lowering your rain-bucket to a more accessible (wind sheilded) level.
As the wind speed increases the number of false tips of the rain gauge will inflate your rain readings
-
Tau Bootis

- Posts: 128
- Joined: Sun 13 Jun 2010 11:44 pm
- Weather Station: WH1081
- Operating System: Windows XP Pro SP3
- Location: Audley Staffordshire UK
- Contact:
Re: Progress on Mounting WX Station
Yes
And if the wind doesn't tip your bucket it will blow the rain away and reduce your readings
This article just about sums it up.. http://www.weathershack.com/education/rain-gage.html
And if the wind doesn't tip your bucket it will blow the rain away and reduce your readings
This article just about sums it up.. http://www.weathershack.com/education/rain-gage.html
Mark

-
b.e.wilson
- Posts: 89
- Joined: Tue 26 Jul 2011 11:07 pm
- Weather Station: Davis Vantage VUE
- Operating System: Windows 10
- Location: Utah, United States
- Contact:
Re: Progress on Mounting WX Station
It was surprising to me, when I first got into weather recording recently, that no one had made a rain gauge that had a mouth which gimbaled into the wind using weather vanes. Or software which corrected for the mouth aspect at different wind speeds (other than for this to work you'd need a drop counter, not a tipping spoon).
Bruce KF7K
http://science.uvu.edu/wilson/weather
http://science.uvu.edu/wilson/weather
-
ScottVan
- Posts: 73
- Joined: Fri 03 Jun 2011 2:58 am
- Weather Station: F/O
- Operating System: Win 10
- Location: Ballston Lake New York
Re: Progress on Mounting WX Station
I'm mounding the transmitter on the shady side of my house inside a home made, dollar store salad bowl screen. Making a new one as my previous design was a bit weak.Charlie wrote:Very cool design! Where are you going to mount the transmitter for the weather station, and did you do your testing with all the cable length in place? Also, slightly off topic, the scanner antenna looks different from anything I've ever seen before. What type is it?
Scanner antenna is older but still available - I've seen it around. It was located in my attic for a while but was not truly effective. I had it up on my back roof on a temporary basis and it works great. Mostly interested in aviation scanning. Other 2 meter antenna will be used for APRS (http://aprs.org).
Scott
-
ScottVan
- Posts: 73
- Joined: Fri 03 Jun 2011 2:58 am
- Weather Station: F/O
- Operating System: Win 10
- Location: Ballston Lake New York
Re: Progress on Mounting WX Station
Good point and thanks for the heads up.beteljuice wrote:If possible you really should think about lowering your rain-bucket to a more accessible (wind shielded) level.
They have a nasty habit of not working in dark and nasty times
.. In fact weather stations don't like weather
I can get to it somewhat easily but not on demand. Need some ladder & scaffolding work setup.
I could mount it down by the transmitter but it will be nearer the house....perhaps on a tri-pod stand off on the house. Some tree hangover I fear tho.
Have a few days to re-think.
-
mermaidbeachweather

- Posts: 71
- Joined: Mon 05 Sep 2011 5:19 am
- Weather Station: Vantage Vue
- Operating System: Windows 7
- Location: Mermaid Bch QLD Australia
- Contact:
Re: Progress on Mounting WX Station
[quote="ScottVan"]I've completed my antenna / wx station mast finally after several months of bio-design processing (thinking). Used a good quality 5' mast from Radio Shack as other masts seemed flimsy and cheap. Crafted a cross member and auxiliary masts from rigid PVC pipe. Not too long so they would stay stiff and straight. Added a guy wire to the wx station mast just to be sure - very solid. Painted the cross member it to match the shaft.
Scanner on one PVC mast, 2 meter HAM radio on main mast, wx station on other pvc mast. Wires extended via Cat 5 twisted pair and weather protected in a weather-resistant box mounted to the pole. Box is completely sealed with silicone inside and out.
Mast is grounded with 6 gauge solid core copper wire to a 8' copper clad steel rod driven into the ground just below the antenna.
I tested the 2 meter HAM antenna and wx station together for several days. No issues. (For those curious, I ran my APRS station for 5 days with a auto xmit every 60 seconds).
Should all go up on the roof this week after the rain stops.
Excellent job, should look even better once installed, its good to see peoples different installations and obtain ideas. Well done
-
ScottVan
- Posts: 73
- Joined: Fri 03 Jun 2011 2:58 am
- Weather Station: F/O
- Operating System: Win 10
- Location: Ballston Lake New York
Re: Progress on Mounting WX Station
Pictures, although they are bad. Getting dark early here. Will post better pics when the sun is out. Transmitter temporarily on a bucket and powered by a car battery. Will be solar-ized as soon as I get it mounted up and off the ground.
You do not have the required permissions to view the files attached to this post.
-
NO0C

- Posts: 21
- Joined: Sat 25 Aug 2012 9:13 pm
- Weather Station: Weatherwise WS-2080
- Operating System: Windows XP
- Location: Kearney, Buffalo County, NE, USA
Re: Progress on Mounting WX Station
Hi everyone,
Isn't PVC about the greatest thing since duct tape ? And reasonably priced as well.
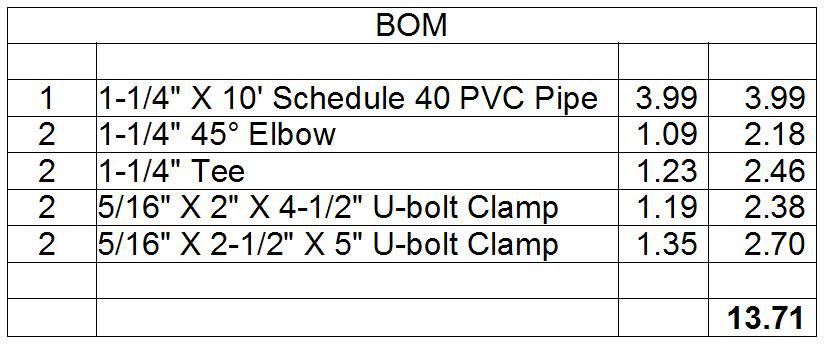
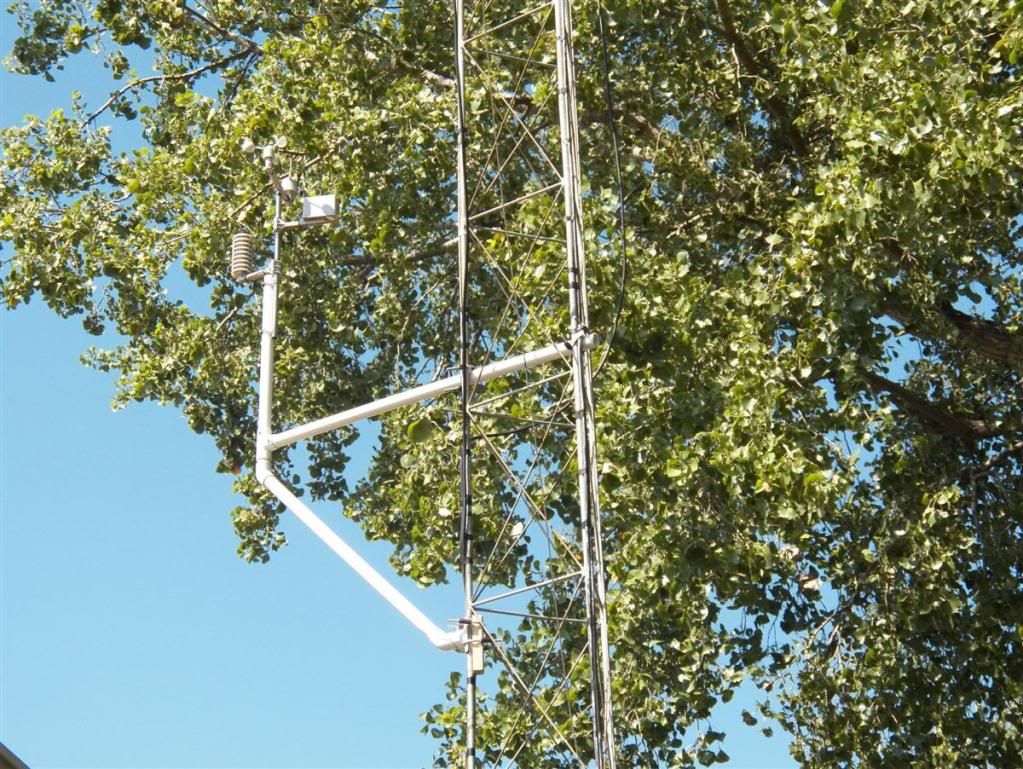
I used it for mounting my WS-2080 sensor array on my ham radio antenna tower. All joints are slip fit with no cement, but 2 joints (outboard tee) are fitted with screws to prevent twisting. The tee at the tower side was cut to remove half of it to fit tower leg. 1/2" copper tubing was used as spacers, along with a flat washer to provide enough threads for tightening of the u-bolt clamps. A piece of pressure treated wood was used to provide a spacer behind the tower leg.
If the array needs service, it's just a matter of loosening all the clamps and rotating the assembly downward to reach it from the roof. The PVC mast makes a great place to hide all of the excess cabling. All tubing is open-ended for water drainage to prevent freezing.
Regards,
Isn't PVC about the greatest thing since duct tape ?
I used it for mounting my WS-2080 sensor array on my ham radio antenna tower. All joints are slip fit with no cement, but 2 joints (outboard tee) are fitted with screws to prevent twisting. The tee at the tower side was cut to remove half of it to fit tower leg. 1/2" copper tubing was used as spacers, along with a flat washer to provide enough threads for tightening of the u-bolt clamps. A piece of pressure treated wood was used to provide a spacer behind the tower leg.
If the array needs service, it's just a matter of loosening all the clamps and rotating the assembly downward to reach it from the roof. The PVC mast makes a great place to hide all of the excess cabling. All tubing is open-ended for water drainage to prevent freezing.
Regards,
Tim
"That makes sense to me, doesn't it?" - DUBYA
"That makes sense to me, doesn't it?" - DUBYA
-
NO0C
- Posts: 21
- Joined: Sat 25 Aug 2012 9:13 pm
- Weather Station: Weatherwise WS-2080
- Operating System: Windows XP
- Location: Kearney, Buffalo County, NE, USA
Re: Progress on Mounting WX Station
Hi all,
Because I measured .06" of rain on a breezy day without a cloud in the sky and the threat of spiders and leaves nesting in the rain
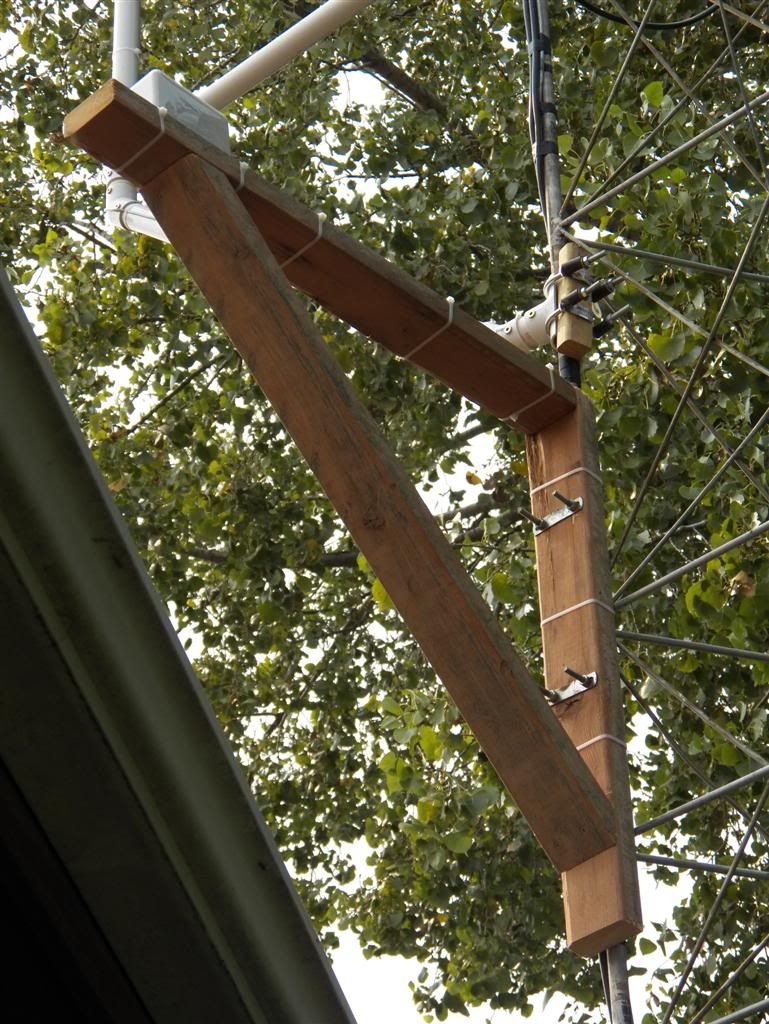
sensor, I moved my rainfall sensor to a different location on the same tower leg. The material list only required a 2X4, a couple deck
screws, a couple u-bolt clamps and a fist full of nyties. Access to the sensor for clean out now requires nothing more than standing
on the roof, rather than having to pivot the mounting fixture as before. I also drilled and installed screws at the six remaining
PVC joints.
Regards,
Because I measured .06" of rain on a breezy day without a cloud in the sky
and the threat of spiders and leaves nesting in the rain sensor, I moved my rainfall sensor to a different location on the same tower leg. The material list only required a 2X4, a couple deck
screws, a couple u-bolt clamps and a fist full of nyties. Access to the sensor for clean out now requires nothing more than standing
on the roof, rather than having to pivot the mounting fixture as before. I also drilled and installed screws at the six remaining
PVC joints.
Regards,
Tim
"That makes sense to me, doesn't it?" - DUBYA
"That makes sense to me, doesn't it?" - DUBYA